| Posted by Musicman 06/22/10
As part of my seemingly endless, and ongoing
project of installing four new tires and wheels, I have thus far
converted the front Drum brakes over to Disc brakes, replaced the front
Wheel Studs with longer studs to accommodate the thicker racing style
hub on my new wheels, installed a new Disc/Drum Master Cylinder to
match up with the new Disc brakes, added a Custom made Bracket to hold
the new Combination Valve which has been added to the new brake system,
and installed a new 10 lb Residual Pressure Valve in the rear lines to
firm up the brake pedal.
Today we started on the next phase of the project, pulling the axles
and replacing the old Wheel Studs using a set of 3" Moroso wheel studs
purchased from Mancini Racing.
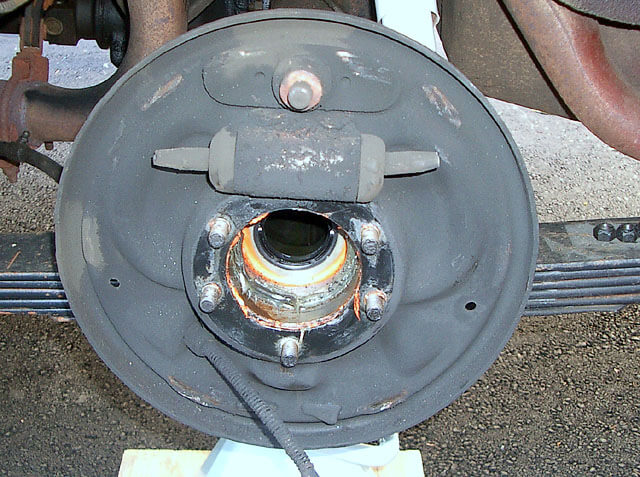
Pulling the axles is actually a relatively simple task, just jack up
the rear end, put it on Jack Stands, and start taking things apart.
Remove the wheels, brake drums, and all of the internal brake
components, just as if you were doing a brake job. Once everything has
been cleared out of the way, your left with five nuts that are holding
the axle in place along with the backing plate for the rear brake
assembly. Take the five nuts off and slide the axle and bearing
assembly out, being careful not to damage the inner seal. The axle has
a set of rather sharp splines on the end where it engages the
differential, and these can damage the seal if you are careless.
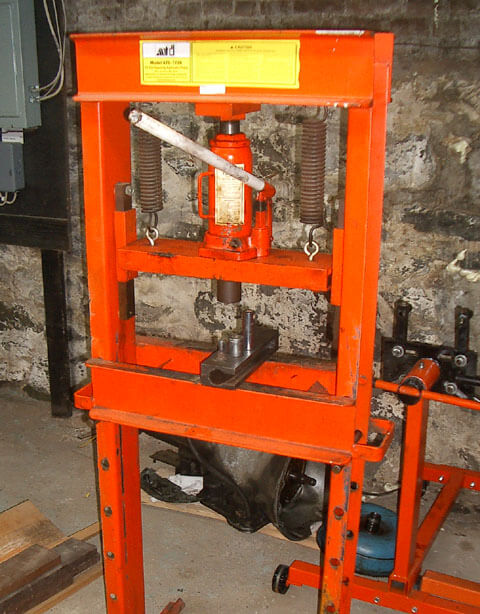
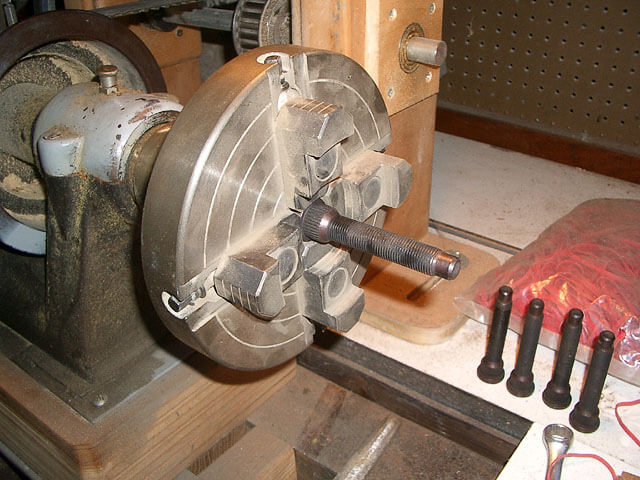
Okay, now that the axles are out, it's time to press out the old wheel
studs and prep the flanges for installation of the new studs. I used a
6" vise to press out the studs on the front hubs, but this time we are
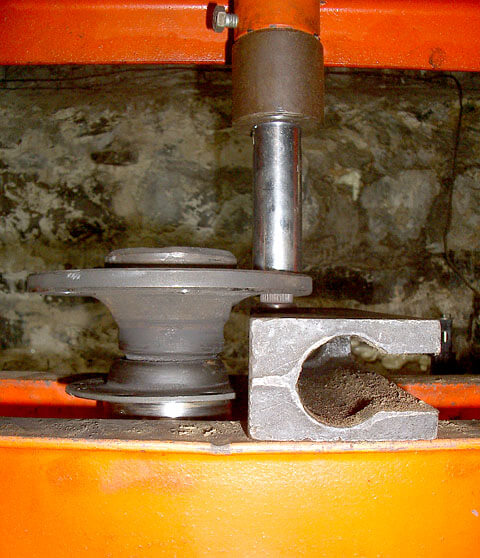
going to be using the correct tool for the job, a 12-Ton Press. I
borrowed this one from a friend since I don't have one of my own.
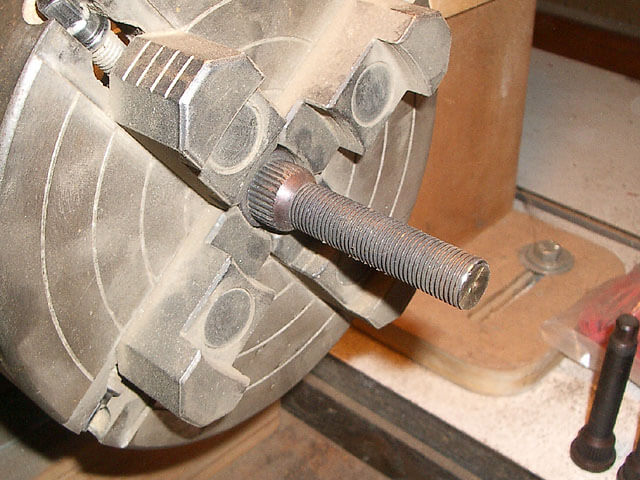
Pressing the studs out is easy enough, I just took an old socket that
was larger than the head of the stud, placed it behind the head
creating a well for the stud to drop into, and pressed the stud out.

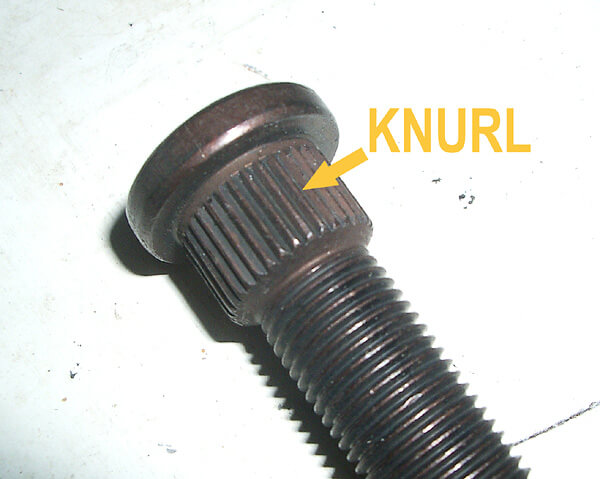
With the studs removed, you can clearly see the lines that were cut
into the axle flange by the knurl of the old stud. The knurl is what
keeps the stud firmly in place and also keeps them from rotating. The
hole in the flange is always drilled several thousandths smaller than
the knurl diameter of the corresponding stud, which is why they must be
forcibly pressed into place.
If you are replacing a factory stud with another direct factory
diameter replacement stud, you will need to take extra care, ensuring
that the knurl splines of the replacement stud are lined up exactly
with the old lines left by the old stud. If you don't, your going to
end up with a loose wobbly stud, and that of course is a bad thing.
Replacement studs sold by Moroso, ARP and others usually have a
slightly larger knurl diameter than the stock factory stud you are
replacing. Typical replacement studs for Chrysler rear end applications
have a knurl diameter of 0.685 where as the original stud is closer to
0.665 - 0.670. This means that you are going to have to dress up the
flange holes before pressing in the new studs. This needs to be done
anyway since the knurl of the replacement stud is almost certainly
going to be different from the original. The holes will have to be
enlarged to within a few thousandths of the new studs knurl diameter to
make the task of pressing them in that much easier. Basically, it has
been designed so that when the holes have been reamed to the correct
size, most or all of the old knurl lines will have been removed, giving
you a nice fresh hole to start from again.
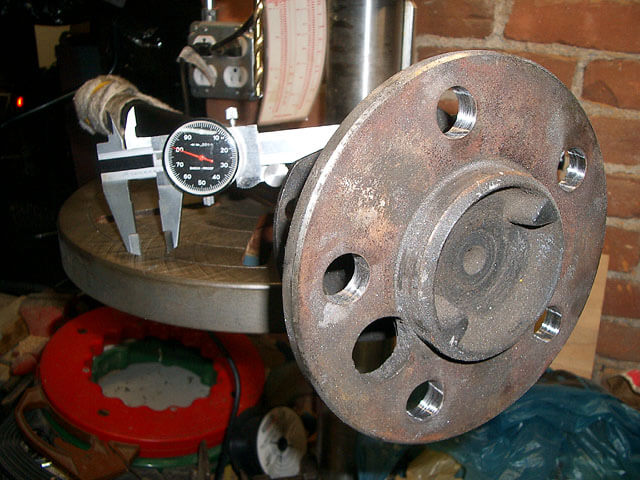
The best tool for the job of reaming out the holes is of course a
tapered reamer mounted on a machine that can be controlled with great
accuracy. Unfortunately, most folks don't have this kind of equipment
kicking around their shop, and even though I do have that capability,
were still going to do the job using something a little more commonly
available, a small sanding drum mounted on a Dremel... quick and easy.
Using my trusty Dremel I carefully buffed out the holes, removing the
old knurl lines, and taking measurements as I went along. I buffed out
the entrance of each hole until I reached a diameter of 0.680 +/- .001,
ensuring a nice easy start when pressing in the studs, but I only
buffed the centers and exit points to roughly 0.675, ensuring a nice
tight fit. These numbers are a little on the small side, but when your
working with a sanding drum mounted on a Dremel, it's always better to
be safe than sorry. Beside. that 12-Ton Press is never going to notice
the disparity.
Okay, the flange holes are ready, now it's time to cut the new studs to
my desired final length. The Moroso studs were ordered with a 3" length
under the head, plus they also have a Quick Start tip which adds
another 3/8". I only require a 2-3/4" stud, so I'm cutting them down.
We used Cave Man tools in the last step, so this time I'm going all
out‚I'm chucking the bolts up in my highly modified, 200+ year old,
Seneca Falls Lathe and cutting them off.
Okay, now I'm just showing off...
Now that the new studs have been cut to length, lets
press them into the flanges. As one might imagine, the process of
pressing IN the new stud is more or less the same as it was for
pressing OUT the old stud, just the tools are reversed. This time I
found myself a good rugged deep well socket for the threaded side of
the stud to ride in while pressing it through from the back. The only
real trick here is to ensure that you get the stud started correctly...
you don't want to press the stud in crooked, that creates real assembly
problems. Take a moment to ensure that everything is square and true,
before pressing in the stud. I started each one, and then took it out
and double checked it before I finished pressing it in. A little extra
effort goes a long way.
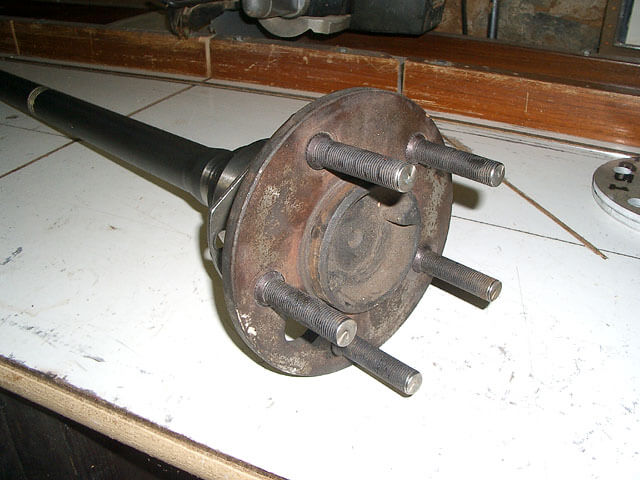
Here's a shot of the axle with the new studs pressed
into place, almost ready to go back in the car. This is a good time to
inspect and re-grease the bearings. My bearings were just fine, and
greasing was a piece of cake using a needle adapter on my grease gun.
Next comes the job of replacing the axles, almost as easy as removing
them but with one extra step. Starting on the Drivers side of the
vehicle, and with a new gasket in place behind the retaining collar
(and/or backing plate if necessary), you carefully slide the axle back
into place. Again, watch the shaft splines going by that seal... Once
in place you can just bolt it back up. Now we move to the Passengers
side of the vehicle. We started on the drivers side because there is an
adjustment that has to be made before the job is done. On the passenger
side there is a lock nut behind the flange that is used to adjust the
end play between the two axles in the final assembly. Since only the
passenger side is adjustable, the drivers side must be installed first.
Back off the adjuster before installing the axle, and leave the
adjuster nuts locking tab off for the moment as well. Bolt up the axle
and bring the nut in to seat the bearings and establish a Zero End Play
between the two axle shafts. Now rotate the prop shaft a few dozen
times to further seat the bearings and force out any excess grease. Go
back and check the end play once again to ensure that you still have
zero end play, if not, then tighten it up and repeat the process. Once
you have everything seated properly and have established a true Zero
End Play, then back off on the adjuster nut about 4 notches to
establish an end play clearance of about 1/64" to 1/32" between the
axles. Now is a good time to wiggle and rotate the axle flanges to
ensure the end play measurement is good and everything is working as it
should. Once you're satisfied that everything is seated properly, and
your end play is good, remove one of the nuts and install the locking
tab... That's it... Done.
Better instruction concerning axle shaft installation and end play
adjustments can be found in your Dodge Service Manual.
|